 Some weeks ago, I was going to build a 55-inch wide boom box to scale, looking just like this one. However, during the laser-cutting process for the front bezel screw holes, the laser caught fire.
Fortunately, the fire was contained within my laser enclosure, but my laser was lost. It was a devastating moment, as I had several jobs lined up that I needed to complete, and now I was unsure of what to do.
The school art show was approaching, and I had planned to create a showstopper to attract new students to the graphic design program and showcase the diverse opportunities graphic design can offer. I compiled a list of 40 different industries where graphic design plays a foundational role in the creative process. (Insert list of careers and their connection to graphic design.)
For several months, I had an 80s-style boombox as the screensaver on my phone. Inspired by this daily reminder, I decided to create my own version of a boombox.
Initially, I intended to make it a card sculpture, crafted from sturdy 140-pound watercolor paper, double-layered and securely glued. This construction technique is remarkably resilient; I have used it to create signs that have remained intact for many years.
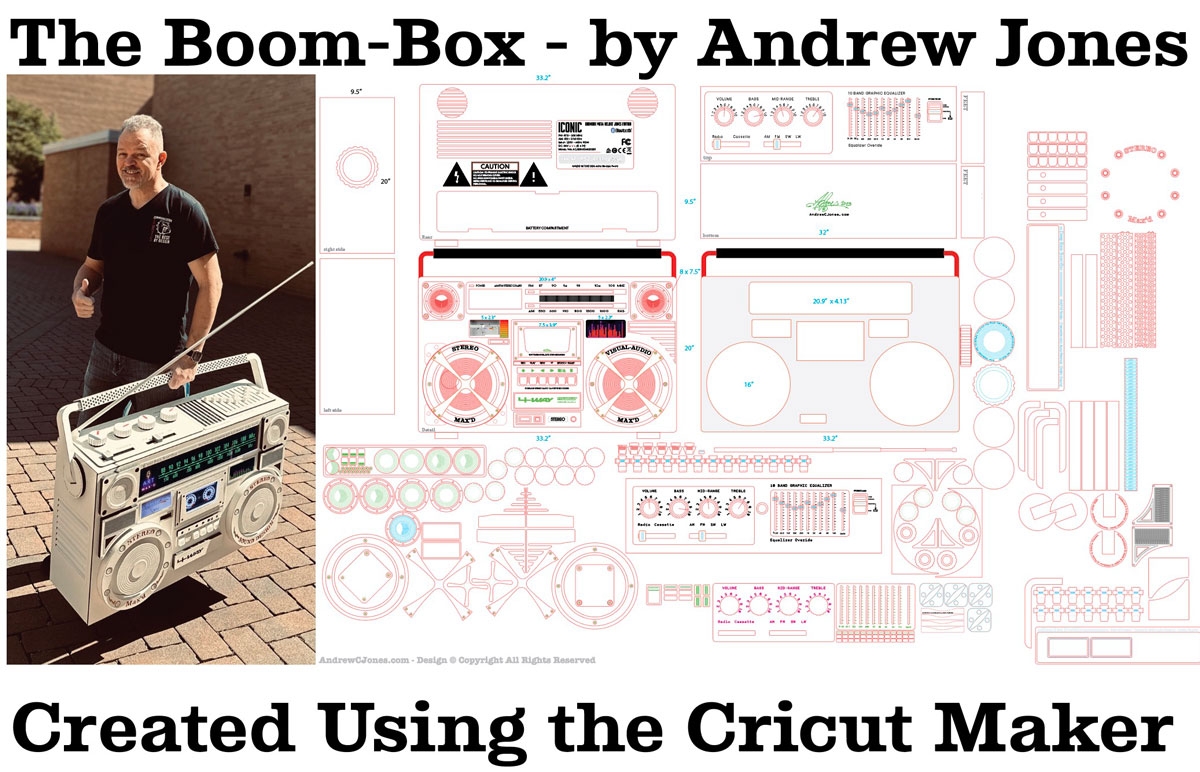
Usually, I start with pencil or pen sketches on paper or use my iPad to draft ideas. But for this geometric and meticulously designed box, I felt it would be best to create it directly in Adobe Illustrator. Utilizing the Bézier tool (pen tool), I drew all the lines that would serve as the main cut lines. I also added scoring lines and developed a technique to create miniature, dotted cut lines to facilitate specific folding.
Several years ago, I created another impressive piece—a large paper art shadowbox measuring 48 inches wide, 27 inches tall, and 10 inches deep.
I will include a photograph of it here and link to the blog post about that particular project once it is posted. Interestingly, the CEO of Cricut contacted me, and I connected with several employees.
I had hopes that Cricut would collaborate with me on a special project for advertising purposes, but unfortunately, those hopes fizzled out. So, I shifted my focus to laser cutting because I enjoy working with a variety of tools.
Creating the stereo involved the entire design process, from start to finish. Even as I began constructing the initial version, I made adjustments to some of its parts because I wasn't satisfied with how they were turning out. I kept some of these design features in the final plans in case anyone who purchases the SVG plans wants to customize the features. I purchased two books of Canson 12" x 18" 140-pound watercolor paper.
This paper is exceptional, as the sheets can be torn out without damage. I placed the sheets on a sticky mat for the Cricut Maker without any issues.
Firstly, I had to calibrate the Cricut Maker for custom materials. Although it has a 140-pound paper setting, I had to increase the pressure poundage and the number of passes to three.
I still need to experiment with this further, as running additional passes risks misalignment or lifting the paper. Ideally, a maximum of two cuts would be preferable, but I will conduct more experiments in early July.
I carefully considered the longest part that needed to be cut in one piece and ensured it fit within the maximum cutting length of the 12" x 24" cutting mat for the Cricut Maker. I knew the remaining cuts would be smaller, so I was confident they would be fine. I aimed to strike a balance between delicate details and ensuring the watercolor paper wouldn't tear. After each cut, if it required, I spray-mounted the watercolor paper onto quarter-inch or half-inch foam core. This polystyrene-based substrate is excellent for presentations and mounting posters. Using a long, high-quality metal ruler and brand new, razor-sharp X-Acto blades, I meticulously cut each piece to match the design contours left by the Cricut Maker.
I began with the front screen of the radio, cutting out the holes for the main elongated rectangle representing the radio, the power meter on the left, the large cassette player space in the middle, and the graphic equalizer on the right. Some months ago, I came across an ad on Instagram for sound-activated LED bars, and I decided to order a test bar. Although they were sold in packs of eight, I only needed one or two packs for this project. I knew they would come in handy. I created a harness and used hot glue and more Cricut Maker cut pieces to align and secure the LEDs. Placing the watercolor paper template on top gave it a perfect white base, and this unit fit into the top of the box for the radio. We will cover the radio, power, tape, and graphic equalizer at the end of this post.
Piece by piece, I designed and redesigned every element, ensuring that I added the desired level of detail. Along the way, I decided to cut an additional layer for many parts and spray-mounted these pieces on top of the already constructed components. This layer featured drawn-in details using either gray or black pen.
The quality is outstanding, and even though I have the first Cricut Maker, it performs exceptionally well. I am extremely pleased with the result.
At this point, I was still uncertain about how I would handle everything. Then, one morning, I had an epiphany and decided to proceed with a bigger plan.
I asked my digital media, junior graphic design, and senior graphic design students to record audio that would be assembled to create a simulated radio playing experience. As the dial was turned, the audio would simulate scanning through different channels.
The dial itself would move on the face of the tuner, eventually stopping at a specific station as the students' recorded audio played. It was a brilliant idea that showcased the power of digital media, graphic design, sound design, and video design, beautifully tying all the pieces together. For a long time, I have emphasized to my students that graphic design is just the starting point.
Over time, they will explore various design areas. Some may venture into clothing design, product design, architecture, or industrial design. Design is omnipresent, from the blocks used to construct buildings to the way trees are planted in parks, from the design of sneakers and phones to cars, houses, TVs, and even food packaging.
This project has ignited the realization within many of my students that their skills in using Illustrator, understanding design principles, textures, contrasts, repetition, and balance give them an unfair advantage in creating things others desire.
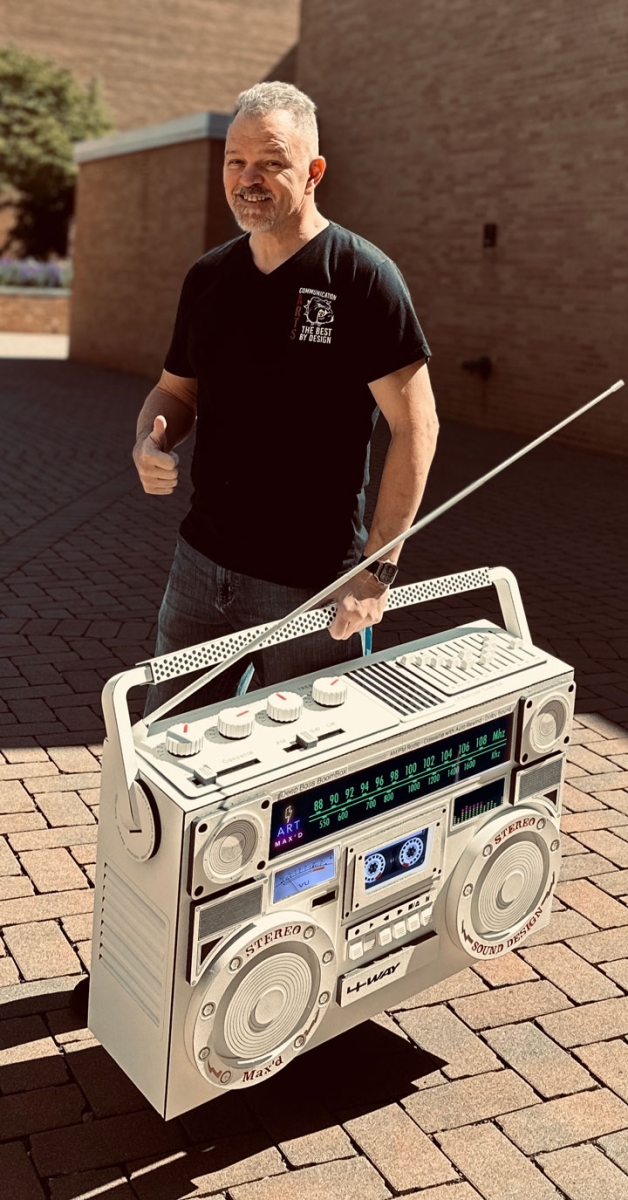
With all the elements coming together for the boom box, the students had completed their audio recordings. I decided to leave the boom box uncolored, retaining its milky white appearance, showcasing the strength and texture of the watercolor paper. It was an excellent decision as it drew focused attention to the design of the boom box itself. In the future, I may create a treated and coated version using decals and printed sheets to make it look more like a real stereo.
I meticulously designed the sliders for the graphic equalizer on the top of the radio. These sliders were comically large and intentionally overlapped, emulating the typical graphic equalizer settings from my younger days. I took three strips of cello tape, coated them with paper, and cut out ribbed-shaped dials.
Each dial was glued with ribs all around the sides, creating a textured knob. To maintain consistency, I spray-painted the knobs with chalkboard white, giving them the appearance of being made from the same paper as the rest of the boom box. The result was fantastic.
I also added actual vents on the back sides and openings on the front for the tuner and tape deck meters. Recognizing that the interior might get warm due to the components I planned to include, I decided to purchase mini blower fans and incorporate functioning vents to help regulate the temperature inside. The vents also served a dual purpose by enhancing the speaker performance.
I designed miniature cuts and perforations, allowing the side vents to fold in a way that they remained invisible from the outside. It worked like a charm and looked amazing. I added grills, textures, flanges, and labels for battery compartments, along with electrical and high-voltage warnings. Comedic stickers and motivational quotes were scattered around the radio, adding a touch of personality.
For the finishing touches, I purchased a telescopic 4-foot-long pointer from my favorite online marketplace, Amazon. After extending it fully, I sprayed it with chalk white paint. This matte-coated pointer was beautifully positioned in the corner of the radio to serve as the perfect antenna. I secured it with hot glue, ensuring it remained rigid.
The same technique was used for the handle, which was strategically placed. In future versions, I may make the handle adjustable, allowing it to fold down or lift up for easier transportation of the boom box.
Using Adobe Premiere Pro, I placed the dial I had drawn in Illustrator, ranging from 88 FM to 108 FM, into a video editing timeline. I created a vector needle that would simulate scanning up and down the airwaves.
These individual PNG files were imported into Adobe Premiere Pro, and as the audio played, I moved the dial accordingly in the animation. I also obtained a recording of a cassette to complete the cassette deck, incorporating text resembling the style of "Guardians of the Galaxy" as a nod to the music of the '70s and '80s, as well as the film itself.
Further browsing on Amazon led me to discover beautiful soft-fading lights, which I placed behind the speakers. Although I should have done a better job of centralizing these lights, the end result was satisfactory.
At the art show, the boom box was a massive hit. Many people expressed interest in purchasing it, taking it home, or even renting it for their upcoming '80s-themed parties. This gave me some ideas, and I plan to create a more sturdy and detailed version, which I will feature in an upcoming YouTube video.
A video showcasing the working boom box and all its glory is included here, and I hope you enjoy it as much as I do.
Thank you for reading! As always, links to the products used are provided in the post, along with a comprehensive list of all the products I used. I'm excited to share my shoe project, which also involves the Cricut Maker and includes SVG plans and a building guide. Stay tuned, as I frequently update this website.
Introducing Art Max'd Rentals: Take Your Party to the Next Level
Some weeks ago, I faced a setback in my plan to build a 55-inch wide boombox replica due to an unexpected fire incident. However, this setback led to a spark of inspiration that has now evolved into an exciting opportunity for all event enthusiasts. I am thrilled to announce that I will be offering rentals of artistic and creative items, including the boombox, camera, and other large-scale props, for weddings, parties, and special events.
Picture this: Your wedding reception is in full swing, and you want to create a memorable experience that will leave your guests in awe. Imagine a stunning, 4-foot wide boombox prop that stands tall, radiating the spirit of the 80s and capturing everyone's attention. The oversized, meticulously designed boombox will serve as an eye-catching centerpiece, setting the tone for a night of dancing, laughter, and celebration. With its intricate details and nostalgic charm, this boombox prop will transport you and your guests back in time to an era of vibrant music and carefree moments.
Not only will the boombox serve as a visually captivating backdrop, but it will also be functional. You and your guests can step up to the microphone, feel the energy of the room, and belt out your favorite tunes. With the ability to connect a microphone and DJ your own tracks, the boombox prop becomes the heart of the party, creating an interactive experience that will have everyone dancing and singing along.
But the boombox is just the beginning. Alongside this iconic prop, I will also be offering a variety of other large-scale items that are sure to elevate your event. Picture a 4-foot wide, digital and old-style camera prop that captures the essence of nostalgia and encourages guests to strike their best poses. With this camera prop, you can create a dedicated photo area where guests can gather, capturing memories that will last a lifetime.
But it doesn't stop there. Imagine a larger-than-life shoe prop, perfect for fashion-themed events, birthdays, or even corporate parties. This attention-grabbing prop will be a talking point, allowing guests to immerse themselves in the world of high fashion and glamour. Whether it's a wedding, retirement party, anniversary celebration, or graduation, these large-scale props will transform your event into an unforgettable experience.
To make the rental process seamless, I have introduced a user-friendly booking system on my website. Simply visit AndrewCJones.com/book to access the booking page. You will have the flexibility to choose your desired prop, select the rental duration, and check availability for your event date. With transparent pricing and clear terms, the booking process will be hassle-free, allowing you to focus on the excitement of planning your event.
Whether you're hosting an intimate gathering or a grand celebration, these large-scale props will add that "wow" factor, making your event truly remarkable. I am dedicated to ensuring that every detail is meticulously designed and crafted to perfection, guaranteeing a visually stunning experience for you and your guests.
So, whether you're a bride and groom looking to create a wedding reception like no other or an event planner seeking to elevate your clients' experiences, consider renting these artistic and creative props. Let the boombox, camera, and other larger-than-life items take center stage, providing the perfect backdrop for laughter, joy, and lifelong memories.
I am beyond excited to embark on this new venture and offer these unique rentals for your special events. Keep an eye out for updates on my website, where you can find more information about the props, pricing, and availability. Let's make your event an extraordinary one!
Thank you for joining me on this journey, and I can't wait to help make your event!
Thank you once again for joining me on this delightful building journey. If you would like your very own boom box, or custom created item, please contact me, and we can discuss the details. I am also considering offering boom box rentals, with the potential for them to be 40 inches wide and resemble a legitimate boom box rather than a paper version. Initially, this will be a venture in North Jersey, but depending on the location, I may be open to negotiating prices to bring the radio to your special event.
This is yet another reason why I encourage you to purchase your own SVG kit, enabling you to create your own radios and rent them out for special events in your area. More plans and ideas are coming soon, so stay tuned!
Sending much love,
Andrew Jones